In this tutorial, we'll build a web application using Flask which will allow the user to upload images to be encoded (i.e., compressed) using a pre-trained variational autoencoder (VAE). Once encoded, the user gets a vector of two elements representing the entire image. The app also allows the user to decode (i.e., decompress) the image based on such a vector.
The outline of this tutorial is as follows:
- The Pre-Trained Variational Autoencoder
- Building a Simple Web Application in Flask
- Building the VAE App Main Structure
- App Main Interface
- HTML Page for Encoding an Image
- Uploading and Encoding an Image
- HTML Page for Decoding an Image
- Decoding an Image
- Complete Code
Bring this project to life
The Pre-Trained Variational Autoencoder
The variational autoencoder (VAE) was introduced in a previous tutorial titled How to Build a Variational Autoencoder in Keras, in which a model is built for compressing images from the MNIST dataset using Keras. The encoder network accepts the entire image of shape (28, 28) and encodes it into a latent vector of length 2, so that each image is compressed into just 2 elements. The encoder's output is then decoded using a decoder network that accepts the latent vector as input, and returns a reconstructed version of the image.
The previous tutorial saved 3 files representing the following 3 models, but we will be interested in just the models for the encoder and the decoder:
- Encoder
- Decoder
- VAE
It is necessary to know how to use these models to encode and decode an image.
Given an image named test.jpg, the first step is to read it according to the following lines of code. Make sure that it is read as a grayscale image by setting the as_gray argument to True.
import skimage.io

img = skimage.io.imread(fname="test.jpg", as_gray=True)
Because we are working with images from the MNIST dataset of shape (28, 28), it is important to make sure that the image shape is (28, 28). Here is an if statement for that purpose.
if img.shape[0] != 28 or img.shape[1] != 28:
    print("Image shape must be (28, 28)")
After reading the image and before encoding it, there is an extra step. The encoder model expects that the input is a 4D array where the dimensions represent the following, in order:
- Number of Samples
- Sample Width
- Sample Height
- Number of Channels
In our application we are only interested in encoding a single image, so the number of samples is 1. The width and height are both equal to 28. The number of channels is 1 because the MNIST images are binary. So, the values for the previous 4 dimensions are as follows:
- Number of Samples:
1 - Sample Width:
28 - Sample Height:
28 - Number of Channels:
1
The 4D array could be created using NumPy as follows:
test_sample = numpy.zeros(shape=(1, 28, 28, 1))The previously read image is then assigned to that array as follows:
test_sample[0, :, :, 0] = imgOne final thing to do is to rescale the pixel values to fall within the 0-1 range, because this is what was used for training the model.
test_sample = test_sample.astype("float32") / 255.0Now we are ready to read the saved encoder model, which is named VAE_encoder.h5.
encoder = tensorflow.keras.models.load_model("VAE_encoder.h5")To encode the image, just call the predict() method that accepts the 4D array and returns the latent vector.
latent_vector = encoder.predict(test_sample)At this moment, we are able to read an image, load the encoder, and encode the image using the encoder. Here is the complete code for doing these steps.
import skimage.io
import numpy
import tensorflow.keras.models

img = skimage.io.imread(fname="test.jpg", as_gray=True)
if img.shape[0] != 28 or img.shape[1] != 28:
    print("Image shape must be (28, 28)")
    exit()

test_sample = numpy.zeros(shape=(1, 28, 28, 1))
test_sample[0, :, :, 0] = img
test_sample = test_sample.astype("float32") / 255.0

encoder = tensorflow.keras.models.load_model("VAE_encoder.h5")
latent_vector = encoder.predict(test_sample)
The next step is to decode that image using the decoder. The decoder expects its input to be a 2D array of the following dimensions:
- Number of Samples.
- Sample Length.
Similar to the encoder, there is only a single sample to be decoded and thus the number of samples is 1. Because each encoded image is represented as a vector of length 2, the sample length is 2. The values for the previous 2 dimensions are as follows:
- Number of Samples:
1 - Sample Length:
2
Here is how to create an empty NumPy array to represent the decoder's input.
latent_vector = numpy.zeros(shape=(1, 2))Assuming that the 2 elements of the vector are 0.1 and 4.2, here is how to assign them to the vector.
latent_vector[0, 0] = 0.1
latent_vector[0, 1] = 4.2
Now we can read the decoder model, which is saved in a file named VAE_decoder.h5.
decoder = tensorflow.keras.models.load_model("VAE_decoder.h5")By calling the predict() method of the decoder, we can reconstruct the image.
decoded_image = decoder.predict(latent_vector)Note that the result of the decoder is a 4D tensor similar to the input of the encoder. Thus, we need to extract the image of that array as follows:
decoded_image = decoded_image[0, :, :, 0]Now that we have this image, we can either save it or show it. Here is how to save it as a file named decoder_image.jpg.
skimage.io.imsave(fname="decoder_image.jpg", arr=decoded_image)Here is the full code that prepares the decoder's input, loads the decoder, decodes the image, and saves the result.
import skimage.io
import numpy
import tensorflow.keras.models

latent_vector  = numpy.zeros(shape=(1, 2))
latent_vector[0, 0] = 0.1
latent_vector[0, 1] = 4.2

decoder = tensorflow.keras.models.load_model("VAE_decoder.h5")

decoded_image = decoder.predict(latent_vector)

decoded_image = decoded_image[0, :, :, 0]

skimage.io.imsave(fname="decoder_image.jpg", arr=decoded_image)
Currently, we have reviewed the steps for encoding and decoding an image from the MNIST dataset based on the pre-trained encoder and decoder networks. The next section discusses building a simple web application using Flask.
Building a Simple Web Application in Flask
The most simple Flask app could be implemented according to the code block below. A flask application is created by instantiating the Flask class and saving the instance in the app variable. After that, a function named vae() is made to listen to the main directory of the server / and respond by just the test Hello.
To run the app the run() method is called, which is fed 3 arguments:
host: This holds the hostname or the IP address at which the server will be activated. It is set to0.0.0.0to listen to all public IPs, or you can specify the exact IP address in your local network.port: Port number, which is set to5000.debug: Set toTrueto run the server in debug mode, which gives some additional information about the server for debugging.
import flask
app = flask.app.Flask(__name__)
@app.route("/", methods=["POST", "GET"])
def vae():
return "Hello"
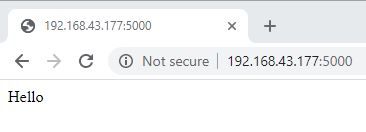
app.run(host="0.0.0.0", port=5000, debug=True)Assuming that the previous code is saved in a file named test_flask.py, then issue the following terminal command to run the server.
python test_flask.pyThe next figure shows the result after accessing the server from the URL http://192.168.43.177:5000/ where my local IP address is 192.168.43.177.
After having a running Flask app, we can start talking about our project. The next section just summarizes the structure of the project to have an overview of the different files and folders we'll be working with.
Project Structure
The structure of the project is given below, assuming that all files and folders are saved in a root directory named VAE_Project. At this root directory, the test_flask.py file holds the Flask application code.
This directory has 2 folders which are:
statictemplates
The static folder has 3 files and 1 folder. The files are:
main.htmlencode.htmldecode.html
Within the static folder there is also a folder named imgs, which is just an empty folder in which the decoded images will be saved.
The templates folder has 2 files:
decode_result.htmlencode_result.html
VAE_Project:
	static:
		main.html
		encode.html
		decode.html
		imgs:
	templates:
		encode_result.html
		decode_result.html
	test_flask.py
The next section builds the main structure of the application so that it loads the encoder and decoder models and serves the requests asking for either encoding, decoding, or something else.
Building The VAE App Main Structure
If the user needs to either encode or decode an image, then the encoder and the decoder models must be loaded. It is not a good idea (at all) to load such models each time they are used. Instead, load them only once so they can be used repeatedly. Thus, a good time to load the models in the Flask app is before running it. Here is how the models are loaded in the app.
import flask

app = flask.app.Flask(__name__)

encoder = tensorflow.keras.models.load_model("VAE_encoder.h5")
decoder = tensorflow.keras.models.load_model("VAE_decoder.h5")

@app.route("/", methods=["POST", "GET"])
def vae():
    return "Hello"

app.run(host="0.0.0.0", port=5000, debug=True)
To have control over all requests coming to the server, all requests will be served using the vae() function. Within this function, other functions will be called based on whether the purpose of the request is to encode, decode, or something else. Below is the main structure of vae() function.
Based on the subject parameter in the incoming request, a decision is made regarding whether the request asks for encoding or decoding an image, or just visiting the main page of the server.
@app.route("/", methods=["POST", "GET"])
def vae():
    subject = flask.request.args.get("subject")
    print(subject)

    if subject == "encode":
        return upload_encode_img(flask.request)
    elif subject == "decode":
        return decode_img(flask.request)
    else:
        return flask.redirect(flask.url_for("static", filename="main.html"))

def upload_encode_img():
    return "Encoder"

def decode_img():
    return "Decoder"
Here are the possible behaviors of the app:
- If the
subjectparameter is available in the request and its value isencode, then the purpose of the request is to encode an image. As a result, the request is forwarded to another function namedupload_encode_image()that is responsible for encoding the image. - If the value in the
subjectparameter isdecode, then it asks for decoding an image and the request is forwarded to thedecode_img()function. - If the
subjectparameter is not available at all, then this means the request does not ask for encoding nor decoding an image and thus an HTML page namedmain.htmlis loaded.
At this moment, the upload_encode_img() and decode_img() functions do nothing except for returning some text.
In Flask, it is preferred to add the HTML files in a folder named static in the main app directory. By doing that, the Flask app could locate such files easily and avoid statically typing the URL of such files. For example, if you want to get the URL for a file named main.html, then just issue this command:
flask.url_for("static", filename="main.html")After getting the URL for a page, you can ask the server to be redirected to this page using the flask.redirect() function as follows:
flask.redirect(flask.url_for("static", filename="main.html"))The next section discusses the implementation of the main.html page.
App Main Interface
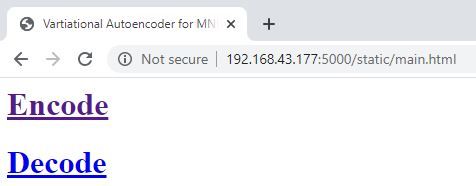
If the user visited the main page of the server, http://192.168.43.177:5000/, then an HTML page is displayed to ask whether the user wants to encode or decode an image. The implementation of this page is given in the following code. Its body has 2 <a> elements: one referring to the encode.html page for encoding an image, and another for the decode.html page for decoding an image.
<html>

<head>
<title>Vartiational Autoencoder for MNIST Dataset</title>
</head>

<body>
<h1><a href="http://192.168.43.177:5000/static/encode.html">Encode</a></h1>
<h1><a href="http://192.168.43.177:5000/static/decode.html">Decode</a></h1>
</body>

</html>
The next figure shows how the main.html looks after visiting the root directory of the server.
The next section discusses the implementation of the encode.html page.
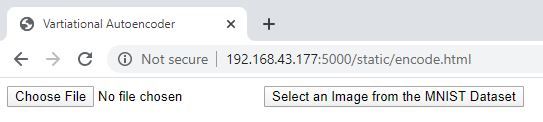
HTML Page for Encoding an Image
The implementation of the encode.html page is listed below. The page just has a form that is submitted to the server at this address: http://192.168.43.177:5000?subject=encode. Note that the subject parameter is available and set to encode to inform the server that it is a request about encoding an image.
<html>

<head>
<title>Vartiational Autoencoder</title>
</head>

<body>
<form action="http://192.168.43.177:5000?subject=encode" method="post" enctype="multipart/form-data">
<input type="file" name="imageToUpload">
<input type="submit" value="Select an Image from the MNIST Dataset" />
</form>

</body>

</html>
The form has just 2 elements:
- An input of type
fileallowing the user to select an image to be uploaded. This element is namedimageToUpload, which will be used at the server to get the selected file. - An input of type
submitwhich is a button that the user clicks to submit the form to the server.
That's everything about the encode.html page. The next figure shows how it looks.
After selecting an image from the MNIST dataset and submitting the form, the server will receive the request in the vae() function which will then be forwarded to the upload_encode_img() function. The next section discusses how this function works.
Uploading and Encoding an Image
After the user submits a form on the encode.html page, the form will be sent to the upload_encode_img() function. The first thing to do in this function is to make sure the file already exists according to the next if statement. It checks whether there is a file with the ID imageToUpload inside the files object of the request. If it does not exist, then the server responds with an HTML page stating that no file is uploaded.
if "imageToUpload" not in encode_request.files:
    return "<html><body><h1>No file uploaded.</h1><a href=" + app_url + ">Try Again</a></body></html>"
If the file already exists, then it is fetched from the files object a follows:
img = encode_request.files["imageToUpload"]To double check that a file is already uploaded, the file name is checked to see whether it is empty or not. If empty, then the server responds with the same HTML page as in the previous case.
if img.filename == '':
    return "<html><body><h1>No file uploaded.</h1><a href=" + app_url + ">Try Again</a></body></html>"
If the file name is not empty, then it is returned as follows:
filename = werkzeug.utils.secure_filename(img.filename)Because the server expects an image file, the uploaded file extension is checked against the list of supported image extensions which are JPG, JPEG, and PNG. If the file extension is not supported, then an HTML page is displayed to inform the user.
_, file_ext = filename.split(".")
if file_ext.lower() not in ["jpg", "jpeg", "png"]:
    return "<html><body><h1>Wrong file extension. The supported extensions are JPG, JPEG, and PNG.</h1><a href=" + app_url + ">Try Again</a></body></html>"
If the uploaded file is an image of a supported extension, then the image is read and its shape is checked according to the following code. An HTML page is displayed in case the image size is not (28, 28).
read_image = skimage.io.imread(fname=filename, as_gray=True)
if read_image.shape[0] != 28 or read_image.shape[1] != 28:
    return "<html><body><h1>Image size must be 28x28 ...</h1><a href=" + app_url + ">Try Again</a></body></html>"
Finally, the image is encoded by calling a function named encode_img().
encode_img(read_image)Until this point, here is the implementation of the upload_encode_image() function.
def upload_encode_image(encode_request):
    if "imageToUpload" not in encode_request.files:
        return "<html><body><h1>No file uploaded.</h1><a href=" + app_url + ">Try Again</a></body></html>"
    img = encode_request.files["imageToUpload"]
    if img.filename == '':
        return "<html><body><h1>No file uploaded.</h1><a href=" + app_url + ">Try Again</a></body></html>"
    filename = werkzeug.utils.secure_filename(img.filename)
    _, file_ext = filename.split(".")
    if file_ext.lower() not in ["jpg", "jpeg", "png"]:
        return "<html><body><h1>Wrong file extension. The supported extensions are JPG, JPEG, and PNG.</h1><a href=" + app_url + ">Try Again</a></body></html>"

    read_image = skimage.io.imread(fname=filename, as_gray=True)
    if read_image.shape[0] != 28 or read_image.shape[1] != 28:
        return "<html><body><h1>Image size must be 28x28 ...</h1><a href=" + app_url + ">Try Again</a></body></html>"

    return encode_img(read_image)
The implementation of the encode_img() function is given below. It accepts the image to be encoded as an argument. Within it, the 4D array is prepared and then the previously loaded encoder model is used to encode the image by calling the predict() method. The returned latent vector is used to fill an HTML template named encode_result.html. Finally, the HTML template is rendered by calling the render_template() function.
def encode_img(img):
    test_sample = numpy.zeros(shape=(1, 28, 28, 1))
    test_sample[0, :, :, 0] = img
    test_sample = test_sample.astype("float32") / 255.0

    latent_vector = encoder.predict(test_sample)
    return flask.render_template("encode_result.html", num1=latent_vector[0, 0], num2 = latent_vector[0, 1])
The render_template() function accepts as an argument the name of the HTML template, in addition to other arguments with their name and value listed (num1 and num2 representing the 2 values of the latent vector).
The name-value arguments are used to fill some locations in the HTML template. The implementation of the encode_result.html file is given below. Within it, there is {{num1}} which will be replaced by the value assigned to the num1 argument in the render_template() function. The same applied for {{num2}}.
Note that the HTML templates are kept within a folder named templates. For more information about templates in Flask, check out this link.
<html>

<head>
<title>Vartiational Autoencoder</title>
</head>

<body>

<h1>Variational Autoencoder for Compressing and Reconstructing MNIST Images</h1>
<h1>Latent vector of the encoded image</h1>
<h3>{{num1}}, {{num2}}</h3>
<h1><a href="http://192.168.43.177:5000">Go to Main Page</a></h1>

</body>

</html>
After the selected image is encoded and the template HTML encode_result.html is filled, the next figure shows the result. The user should copy the printed values, as they represent the encoded image to be used later for decoding. The next section discusses how the app decodes images.

HTML Page for Decoding an Image
In the the main page of the server, there are 2 <a> elements which forward the user to either a page to encode or decode an image. Previously, the encoding part was discussed. This section discusses the decoding part. The HTML page that is rendered after the user clicks on the Decode link is given below.
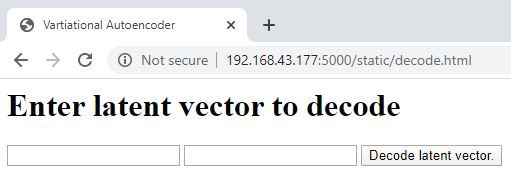
The page has a form with 3 input elements. The first 2 are of type number that allow the user to type the values of the latent vector. Their names are num1 and num2. These names will be used at the server to access their values. The third element is of type submit to submit the form to this URL: http://192.168.43.177:5000?subject=decode. Note that the subject parameter is assigned the value decode to tell the vae() function at the server that this request is about decoding an image.
<html>

<head>
<title>Vartiational Autoencoder</title>
</head>

<body>
<h1>Enter latent vector to decode</h1>
<form action="http://192.168.43.177:5000?subject=decode" method="post">
<input type="number" name="num1" step="any">
<input type="number" name="num2" step="any">
<input type="submit" value="Decode latent vector." />
</form>

</body>

</html>
The next figure shows how the decode.html page looks.
The next section discusses the behavior of the server after the form is submitted.
Decoding an Image
After the user enters the values of the latent vector and submits the form in the decode.html page, the request will be forwarded to the vae() function at the server that will in turn call the decode_img() function. The implementation of this function is listed below. It starts by fetching the 2 numeric values with names num1 and num2 passed in the form. Then, it prepares an empty NumPy array that will be filled by these 2 values.
def decode_img(decode_request):
    global im_id
    num1, num2 = decode_request.form["num1"], decode_request.form["num2"]

    latent_vector  = numpy.zeros(shape=(1, 2))
    latent_vector[0, 0] = num1
    latent_vector[0, 1] = num2
    print(latent_vector)

    decoded_image = decoder.predict(latent_vector)
    decoded_image = decoded_image[0, :, :, 0]

    saved_im_name = os.path.join(app.config['UPLOAD_FOLDER'], "vae_result_" + str(im_id) + ".jpg")
    im_id = im_id + 1
    skimage.io.imsave(fname=saved_im_name, arr=decoded_image)

    return flask.render_template("decode_result.html", img_name=saved_im_name)
The decoder decodes such a vector into an image by passing the array to the predict() method. The decoded image is then saved at the server side. The location to which the image is saved is the result of joining the directory of the upload folder with the image name. The upload folder location could be specified before running the sever, as given below. There is a folder named imgs under the static directory in which the uploaded files will be saved.
IMGS_FOLDER = os.path.join('static', 'imgs')
app.config['UPLOAD_FOLDER'] = IMGS_FOLDER
The name of each uploaded image is given a unique ID according to the im_id variable. It is a global variable that is declared before running the server and initialized as 0.
After the image is saved, the server renders the decode_result.html template after passing the argument img_name to the render_template() function. The implementation of the decode_result.html template is given below. Note that this file should be saved in the templates directory.
The template has an <img> element with its src attribute set to {{img_name}}, which will be replaced by the value assigned to the img_name argument in the render_template() function.
<html>
<head>
<title>Vartiational Autoencoder</title>
</head>
<body>
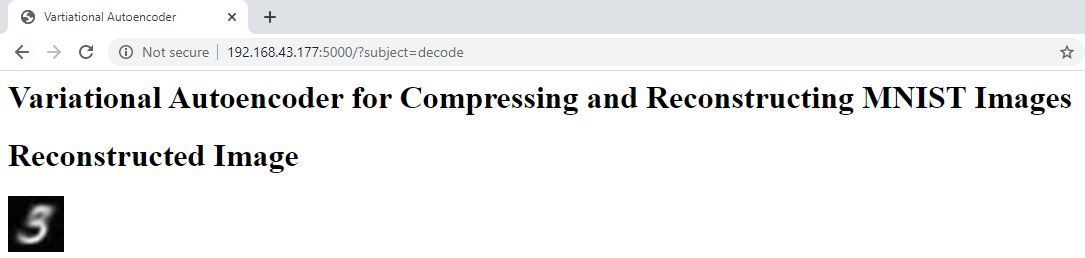
<h1>Variational Autoencoder for Compressing and Reconstructing MNIST Images</h1>
<h1>Reconstructed Image</h1>
<img src="{{img_name}}" width="56" height="56">
</body>
</html>The next figure shows the result after the template is rendered.
Complete Code
The complete code for the Flask app is listed below.
import flask
import werkzeug, os
import tensorflow.keras.models
import numpy
import skimage.io

IMGS_FOLDER = os.path.join('static', 'imgs')

app_url = "http://192.168.43.177:5000" #"https://hiai.website/vae_mnist"

app = flask.app.Flask(__name__)
app.config['UPLOAD_FOLDER'] = IMGS_FOLDER

encoder = tensorflow.keras.models.load_model("VAE_encoder.h5")
decoder = tensorflow.keras.models.load_model("VAE_decoder.h5")

im_id = 0

@app.route("/", methods=["POST", "GET"])
def vae():
    subject = flask.request.args.get("subject")
    print(subject)

    if subject == "encode":
        return upload_encode_image(flask.request)
    elif subject == "decode":
        return decode_img(flask.request)
    else:
        return flask.redirect(flask.url_for("static", filename="main.html"))

def upload_encode_image(encode_request):
    if "imageToUpload" not in encode_request.files:
        return "<html><body><h1>No file uploaded.</h1><a href=" + app_url + ">Try Again</a></body></html>"
    img = encode_request.files["imageToUpload"]
    if img.filename == '':
        return "<html><body><h1>No file uploaded.</h1><a href=" + app_url + ">Try Again</a></body></html>"
    filename = werkzeug.utils.secure_filename(img.filename)
    _, file_ext = filename.split(".")
    if file_ext.lower() not in ["jpg", "jpeg", "png"]:
        return "<html><body><h1>Wrong file extension. The supported extensions are JPG, JPEG, and PNG.</h1><a href=" + app_url + ">Try Again</a></body></html>"

    read_image = skimage.io.imread(fname=filename, as_gray=True)
    if read_image.shape[0] != 28 or read_image.shape[1] != 28:
        return "<html><body><h1>Image size must be 28x28 ...</h1><a href=" + app_url + ">Try Again</a></body></html>"

    return encode_img(read_image)

def encode_img(img):
    test_sample = numpy.zeros(shape=(1, 28, 28, 1))
    test_sample[0, :, :, 0] = img
    test_sample = test_sample.astype("float32") / 255.0

    latent_vector = encoder.predict(test_sample)
    return flask.render_template("encode_result.html", num1=latent_vector[0, 0], num2 = latent_vector[0, 1])

def decode_img(decode_request):
    global im_id
    num1, num2 = decode_request.form["num1"], decode_request.form["num2"]

    latent_vector  = numpy.zeros(shape=(1, 2))
    latent_vector[0, 0] = num1
    latent_vector[0, 1] = num2
    print(latent_vector)

    decoded_image = decoder.predict(latent_vector)
    decoded_image = decoded_image[0, :, :, 0]

    saved_im_name = os.path.join(app.config['UPLOAD_FOLDER'], "vae_result_" + str(im_id) + ".jpg")
    im_id = im_id + 1
    skimage.io.imsave(fname=saved_im_name, arr=decoded_image)

    return flask.render_template("decode_result.html", img_name=saved_im_name)

app.run(host="192.168.43.177", port=5000, debug=True)
Conclusion
This tutorial used a pre-trained variational autoencoder for building a Flask web application that allows the user to encode and decode images from the MNIST dataset. The tutorial gave an overview of Flask by building a simple application, and then discussed the details of encoding and decoding images on the web.